
Your washing machine works tirelessly to keep your clothes fresh and clean, but have you ever wondered what keeps it running smoothly ? While most homeowners focus on wiping down the exterior or cleaning the detergent drawer, the most overlooked component is actually one of the easiest to maintain. This small yet crucial part collects debris, lint, and forgotten items from your laundry loads, and when neglected, it can lead to serious performance issues. Understanding why this area becomes so dirty and how to address it quickly can save you from costly repairs and ensure your appliance continues functioning at its best for years to come.
Why this hidden component accumulates so much grime
The filter in your washing machine serves as a protective barrier between your laundry and the drainage system. Every time you run a cycle, water carries away dirt, soap residue, pet hair, and loose threads. This component traps these particles before they can clog the drainage pipe or damage the pump mechanism. Over time, however, this essential part becomes saturated with accumulated waste.
What makes this area particularly problematic is the variety of materials it captures. Beyond the expected lint and fabric fibers, you’ll often find coins, buttons, bobby pins, tissues left in pockets, and even small jewelry items. These objects combine with detergent buildup and create a sticky, unpleasant mess that restricts water flow. When this happens, your appliance struggles to drain properly, leading to extended wash cycles and potential water leaks.
Many people don’t realize that regular maintenance of this component is just as important as cleaning other household appliances. Just as you wouldn’t neglect removing ice from your freezer to maintain efficiency, this filter requires periodic attention to prevent operational problems. The frequency of cleaning depends on your laundry habits, but experts recommend checking it every three to four months at minimum.
Step-by-step instructions for quick and effective cleaning
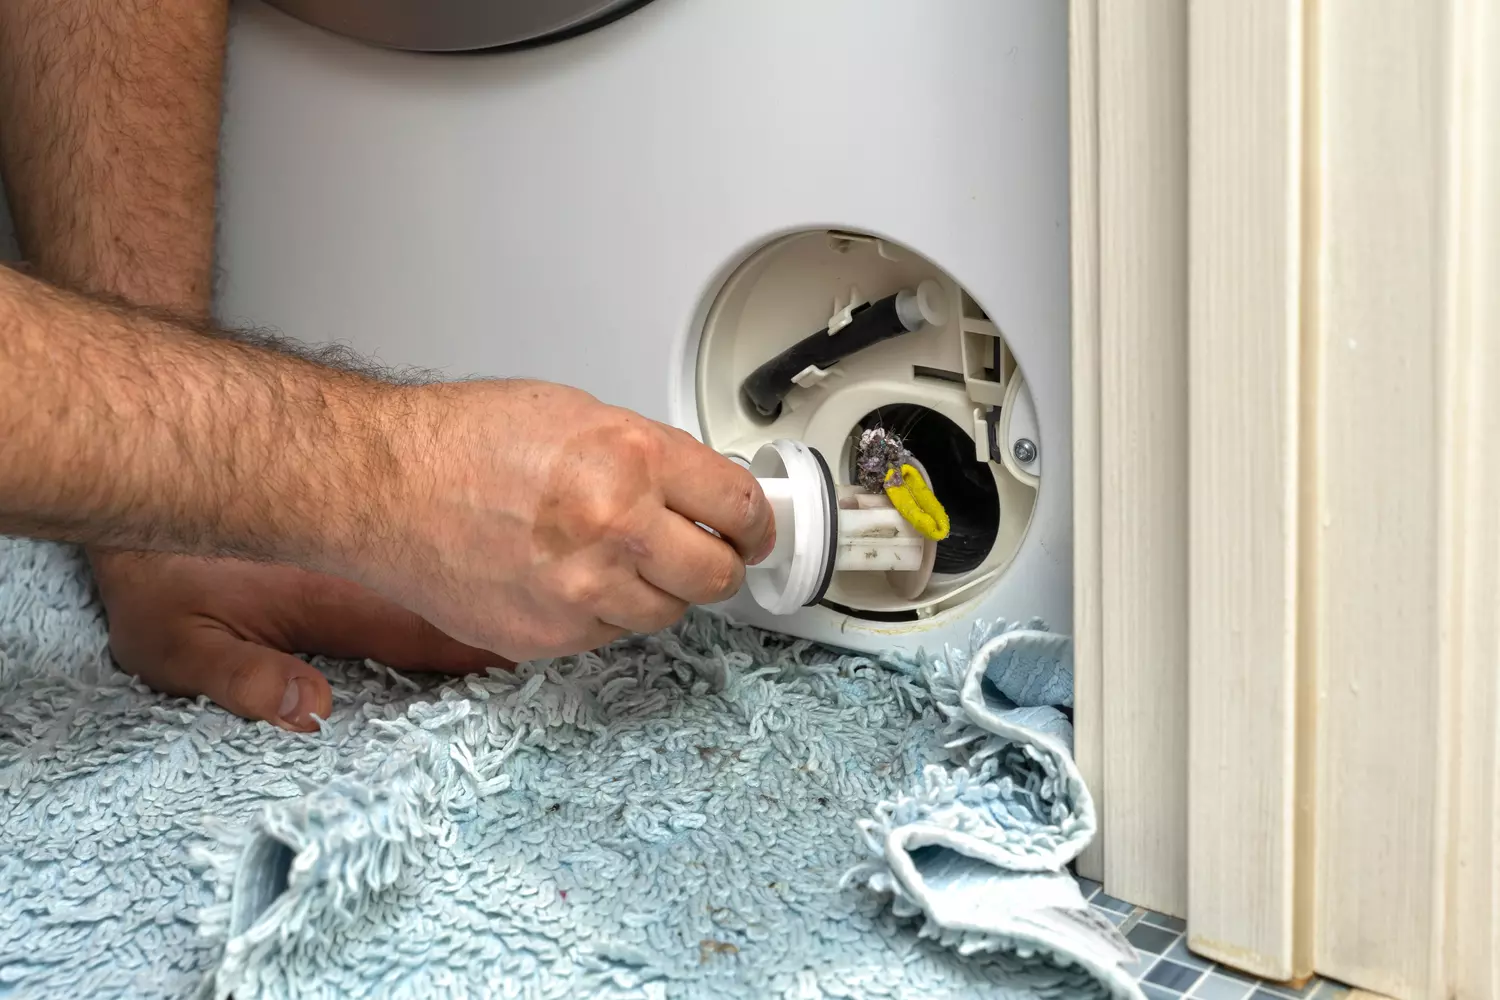
Before beginning the cleaning process, you’ll need to gather a few simple supplies. Have a shallow container or old towels ready to catch any residual water that drains out. Most front-loading machines have this component located behind a small access panel near the bottom front of the unit, while top-loaders may have it positioned differently depending on the manufacturer.
Safety should always come first when working with any electrical appliance. Make sure to disconnect the power supply before attempting any maintenance. Once you’ve located the access door, open it carefully and prepare for some water spillage. Place your container or towels beneath the opening to prevent floor damage.
The removal process requires gentle persistence. Turn the filter counterclockwise slowly, as it may resist if it hasn’t been removed recently. Once loosened, pull it out completely and empty any standing water into your container. You’ll likely be surprised by the amount of debris that has accumulated inside. Here’s what you should do next :
- Remove all visible debris and foreign objects from the filter itself
- Check the filter housing cavity for any items that may have bypassed the screen
- Use a soft brush or cloth to scrub away sticky residue and buildup
- Rinse everything thoroughly under warm running water until completely clean
- Inspect the filter for any damage or wear that might require replacement
After cleaning, ensure both the filter and its housing are completely dry before reinstallation. Insert the component back into place and turn it clockwise until it locks securely. Close the access panel and restore power to your machine. Run a short rinse cycle to verify everything is functioning properly and no leaks have developed.
Preventing future buildup and maintaining optimal performance
Once you’ve experienced how dirty this component can become, you’ll understand why preventive measures are essential. Empty all pockets before loading laundry to minimize the amount of foreign objects entering the system. Consider using mesh laundry bags for delicate items that shed fibers easily, and always remove pet hair from clothing before washing when possible.
Establishing a regular cleaning schedule makes this task less daunting. Mark your calendar every three months as a reminder, or more frequently if you do large amounts of laundry or wash heavily soiled items regularly. This simple habit prevents the severe buildup that makes cleaning more difficult and protects your appliance from premature wear.
Beyond the filter, maintaining other areas of your washing machine contributes to overall cleanliness. Leave the door open between loads to allow moisture to evaporate and prevent mold growth. Wipe down the rubber seal periodically and run an empty hot water cycle with vinegar monthly to eliminate soap scum. These practices, combined with filter maintenance, keep your appliance running efficiently. Just as there are dirtiest places in the house that require attention, this washing machine component demands similar vigilance.
Signs your filter needs immediate attention
Even with regular maintenance, certain warning signs indicate an urgent need for cleaning. If your washing machine takes significantly longer to complete cycles, this suggests drainage problems caused by a clogged filter. Water remaining in the drum after the spin cycle finishes is another clear indicator that something is obstructing proper water flow.
Unusual odors emanating from your machine often point to accumulated organic matter trapped in the filter. This stagnant debris creates an environment where bacteria and mildew thrive, producing unpleasant smells that transfer to your clean laundry. If you notice your supposedly clean clothes smelling musty, the filter is likely the culprit.
Visible water leaks near the base of your machine should never be ignored. While multiple factors can cause leaks, a blocked filter forcing water to escape through alternative paths is a common cause. Addressing this issue promptly prevents water damage to your floors and surrounding areas while protecting the internal components of your appliance from strain that shortens its lifespan.
